Validation Rules in Salesforce: A Comprehensive Guide


25/01/2024


Introduction

Briefly introduce the significance of validation rules in Salesforce and how they contribute to data integrity and accuracy.

Section 1: Understanding Validation Rules

Explain what validation rules are and their purpose in Salesforce. Highlight their role in enforcing data quality and preventing incorrect data entry.

Section 2: Components of a Validation Rule

Break down the key components of a validation rule:

  • Rule Criteria: Explain the conditions that trigger the validation rule.
  • Error Message: Discuss the importance of clear and user-friendly error messages.

Section 3: Use Cases and Examples

Provide practical examples of common scenarios where validation rules are useful. For instance:

  • Ensuring a phone number is in the correct format.
  • Validating that a certain field is not empty.
  • Checking date ranges or numerical conditions.

Section 4: Step-by-Step Guide to Creating Validation Rules

Walk your readers through the process of creating a validation rule in Salesforce:

  • Navigating to Setup > Object Manager.
  • Choosing the object for which you want to create the validation rule.
  • Defining the rule criteria and specifying the error message.

Section 5: Best Practices

Share best practices for creating effective validation rules:

  • Keep rules simple and specific.
  • Test rules thoroughly before deploying to production.
  • Document validation rules for future reference.

Section 6: Troubleshooting Validation Rules

Discuss common issues users might face with validation rules and how to troubleshoot them. Include tips on using debug logs and system-generated error emails.

Section 7: Advanced Topics

Explore advanced validation rule topics, such as using formulas, cross-object validation, and employing custom JavaScript for complex scenarios.

Conclusion

Summarize the key points and emphasize the importance of incorporating validation rules in Salesforce customization for maintaining data accuracy.

Additional Resources

Provide links to official Salesforce documentation, Trailhead modules, or other helpful resources for readers who want to delve deeper into the topic.

Remember to use a conversational tone, include visuals (such as screenshots or diagrams), and keep your content engaging. This structure should help you create a well-rounded and informative blog post on validation rules in Salesforce.


Validation Rules in Salesforce: A Step-by-Step Guide for Data Integrity

Creating a validation rule in Salesforce involves several steps. Here's a step-by-step guide:

Step 1: Log in to Salesforce

Access your Salesforce instance and log in with the necessary credentials.

Step 2: Navigate to the Object Manager
  1. From the App Launcher (grid icon), select "View All" and find "Object Manager."
  2. In the Object Manager, choose the object for which you want to create the validation rule (e.g., Account, Contact).
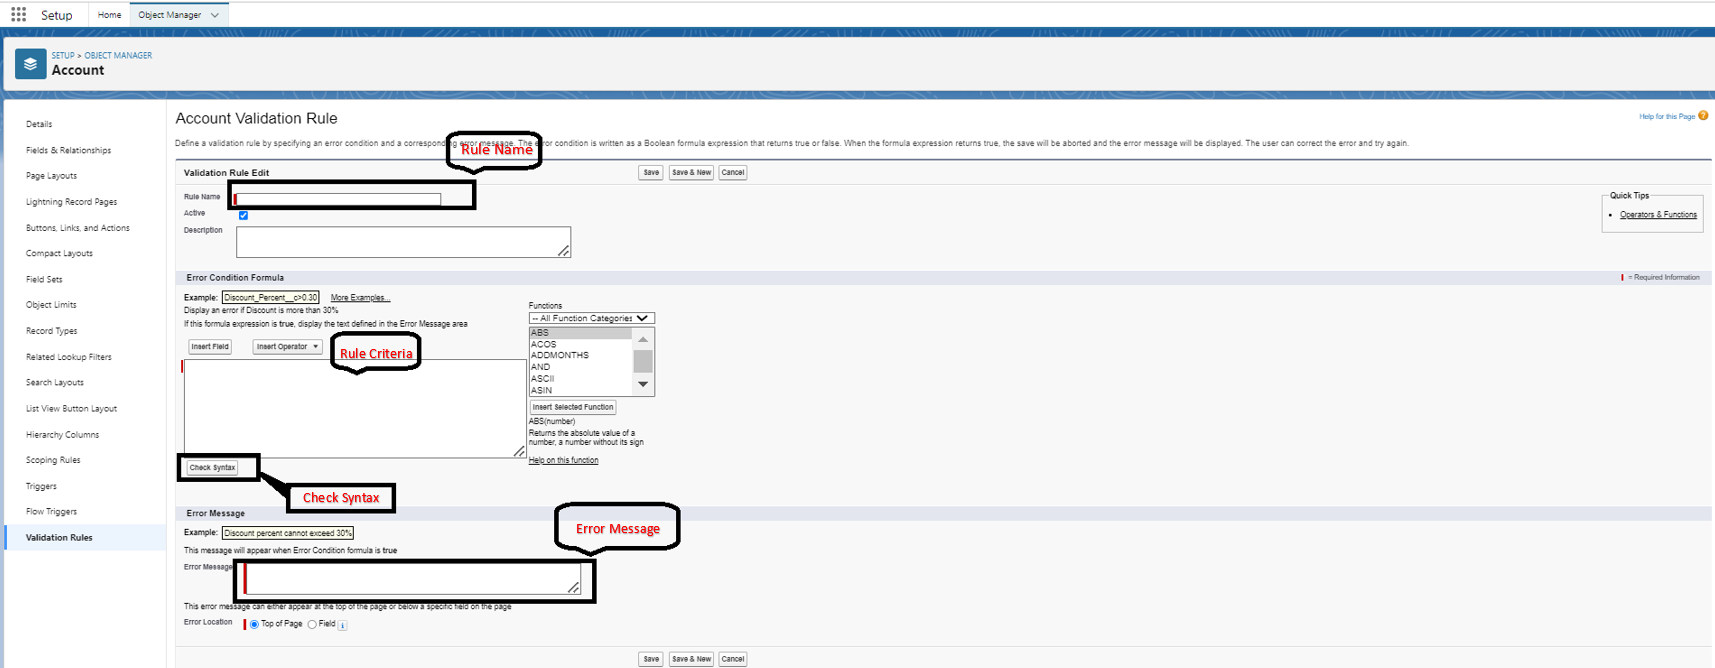
Step 3: Select Validation Rules
  1. In the Object Manager, select the "Validation Rules" tab on the left sidebar.
  2. Click the "New Validation Rule" button.
Step 4: Define Rule Details
  1. Rule Name: Provide a descriptive name for your validation rule.
  2. Description: Optionally, add a brief description to explain the purpose of the rule.
Step 5: Specify Rule Criteria
  1. In the "Rule Criteria" section, enter the formula that defines when the validation rule should fire. For example:


    ISPICKVAL(Type, "Customer") && AnnualRevenue < 100000

    This formula checks if the record type is "Customer" and the Annual Revenue is less than $100,000.

  2. Ensure that your formula returns a true or false value. If the formula evaluates to true, the validation rule triggers.

Step 6: Set Error Message
  1. In the "Error Message" section, enter a clear and user-friendly error message that explains why the validation rule is being enforced.

    Please ensure Annual Revenue is less than $100,000 for Customer records.
Step 7: Activate the Rule
  1. Toggle the "Active" checkbox to activate the validation rule.
Step 8: Save the Rule
  1. Click the "Save" button to save your validation rule.

Step 9: Test the Validation Rule
  1. Navigate to the object you applied the validation rule to (e.g., Accounts or Contacts).
  2. Try to create or edit a record that meets the criteria specified in your validation rule.
  3. If the criteria are not met, Salesforce should display the error message you defined.

Congratulations! You've successfully created a validation rule in Salesforce. Keep in mind that validation rules are powerful tools for maintaining data integrity, but they should be thoroughly tested before deployment to production to avoid unintended consequences.